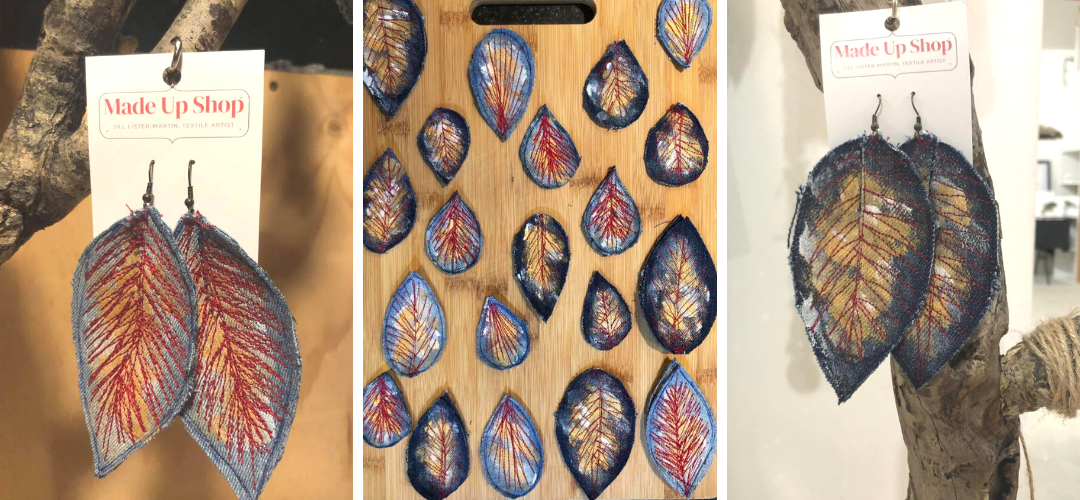
These gorgeous recycled denim leaf earrings are light to wear, and very much one-of-a-kind, especially after you’ve put your own spin on them.
Tools and Materials:
- Denim scraps
- Hand sewing needle and a sewing machine is very handy if you have one.
- Threads- dark blue, and your highlight color for the veins of the leaf. I’ve used red but I sometimes use pinks, blues, greens, or purples. It’s entirely up to you.
- Paint and paintbrush or sponge- I’ve used white paint with gold over the top.
- Earring hooks
- Scissors
- Free Pattern download available here
Tracing your earrings onto the denim.
Find a flat piece of denim and lay it out flat. Fold the fabric in half with the good side of the denim on the outside.
Cut out the pattern pieces you would like to use. The free pattern download is available here
Trace the pattern piece onto the denim, 2 for each pair of earrings you plan on making. I use a pen to draw on the fabric. If the denim is very dark a silver pen will work well too. If you do use a silver pen, draw just outside the pattern piece and we will cut the silver marks off later. Place a pin in the middle of each leaf you’ve traced.
Sew around the outline of the leaf on the sewing machine. If you did use a silver pen sew just inside the pen line.


Paint the Leaf
It’s time to start painting the leaves. You can use a sponge or paint brush.
I’m using white and gold. I put the white on first so the gold doesn’t get lost in the denim. Slowly build up the colour, and don’t necessarily take it all the way to the edge of the leaf. If you accidentally put a bit more colour on than you’d like, you can blot it off with a sponge or tissue, or dilute it slightly with some water.


Stitching the Denim Leaf Veins
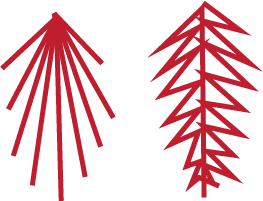
When I stitch the veins I have 2 main patterns I use, the first keeps returning to the start point and the other zigzags down like an inverted Christmas tree.
I just use the straight stitch and back stitch on the sewing machine. No single leaf is ever the same. On the bigger leaves I use both patterns, sometimes in different shades of a colour.
Cutting out the Leaves
Cut around the outside of the outline stitching of each leaf. If you cut through the stitching the 2 layers will come apart.
Take the 2 leaves that make a pair of earrings, lay them on top of each other to make sure they are roughly the same size and shape. If they aren’t give them a slight trim.
Make a cut from the base of the leaf, about 2-3cm down. The length of cut will depend on the length of your leaf, and how much you would like it to curl.
Spread the cut and overlap to create the shape you would like.


Adding the Earring Hook.
Take your needle and thread and stitch through the overlapped section to connect the 2, after a few stitches, knot the thread.
There is sometimes a slight overhang of the pointy corners, snip them off if needed.
Take the earring hook and stitch through the hook and into the leaf. You can really do this however you like. I do have a particular routine I usually do, but it’s best to follow the video rather than weirdly trying explain it with words. But if you’re just doing it your own way, I’d recommend looping the thread around the base of the earring ring, just between the hardware and the denim leaf, then continue stitching. This just reinforces the connection.


Thank you for checking out my tutorial. If you make the earrings or a version of the leaves I’d love it if you share it with me, or tag me on Instagram or Facebook at @madeupshop.textileartist
This is a free tutorial, so it would be amazing if helped me out by sharing or repinning any of the content.
Thank you!